
City Adventure Traffic & AI System — Documentation
Documentation for using our traffic blueprints for cars, trams and planes. Describes each element and includes tutorials for common scenarios.
Scroll down to learn more.
Index.
1. Content Structure
1.1 Controllers
1.2 Splines
1.3 Intersections
1.4 Pedestrians
1.5 Vehicles
2. Vehicle Systems
2.1 Blueprint Vehicle
2.2 Blueprint Vehicle Simplest
3. Vehicle Tutorial (Physic Based)
3.1 First Track
3.2 First car
3.3 Other vehicles avoidance
3.4 Expanded Track
3.5 Intersections
3.6 Delays
3.6.1 Stop
3.6.2 Parking lot
3.6.3 Gas station
3.7 Spawn point
3.7.1 Spawn Point timeout
4. Vehicle Tutorial (Spline Based)
4.1 Spline Setup
4.2 Cars Placement
4.2.1 Automatic
4.2.2 Manual
4.2.3 Master Controller
5. Traffic Lights System
6. Tram System
7. Planes System
7.1 Taxing
7.2 Flying
7.3 Propeller vs Jet Planes
8. Pedestrians System
8.1 Automatic
8.2 Manual
9. Custom Actor for Cinematics
1. Content Structure
In the Blueprints directory, you'll find all the components needed for many traffic scenarios.
Controllers with master controllers to make parents from them for your custom models,
Intersections with traffic lights
Pedestrians with people to put on the map
Traffic with splines (tracks) types to put on the map,
Vehicles with configured models ready to run on the splines
1.1 Controllers
Our system is divided into 4 subsystems: Vehicle, Tram, Pedestrian, and Airplane.
Each tailored for its specific purpose. Cars and scooters are driving freely on the city map using real physics and randomly choosing tracks to follow. Trams move along one long, looped track and just rides it. Airplanes can move slowly at the airport (taxing) or take off, fly, and land gently. Pedestrians can stand in place or move from house to house over designated track.
Each of them needs a slightly different setup and execution. Knowing all of them helps in the decision which one to use for your individual needs or expanding what we prepare.
1.2 Traffic splines
Splines are lines that need to be placed on the map for our system. It uses them to determine where to go.
Each one has different sets of options for a different use case.
1.3 Intersections
Traffic light blueprint — BP_TrafficLight is used to stop vehicles on intersections.
More of using it in a dedicated section.
1.4 Pedestrians
All the people you can put to make the city feel alive. We prepare two types of models: square and rounded for your aesthetic needs.
Read more of using them in a dedicated section.
1.5 Vehicle blueprints
You can use any own models with our systems. For our asset pack we already prepare working blueprints for each model.
When you want to add vehicle that is controlled by AI choose from those. If you want to add just a model as stationary element in environment use SK_ models from Content directory.
Do not use those as stationary objects. They will use precious CPU cycles for no reason.
2. Vehicles System

We implemented two main traffic systems.
Complex, physic based and simple spline based.
BP_Vehicle has more features and uses a real physics engine but also needs more resources to run smoothly. For simpler games and/or mobile we introduced the BP_Vehicle_Simplest that doesn't use physics and has fewer features.
You can mix and match both of them in one project. Or use them in different scenarios whatever fits best.
2.1 Blueprint Vehicle

This system is the most complex and has the most features. But it's still easy to use.
Each vehicle is a Skeletal Mesh with four wheels. It has AI_Driver as the controller. This blueprint drives a car over active BP_Road_Spline. When it reaches the end of it it can select randomly from three connected splines to continue driving. If it's the end it stops. When the car gets stuck (for 5 seconds) it will restart if it has BP_Vehicle_SpawnPoint selected at that spawn point. Vehicles use one ray cast to detect other cars in front and slows down to avoid crashing.
Read the tutorial (3.0) on how to use this system in various scenarios.
2.2 Blueprint Vehicle Simplest
This system is for low-end devices when you just need to simulate movement in the city without all the crashes, randomization, and physics. Good for economy simulation games or mobile.
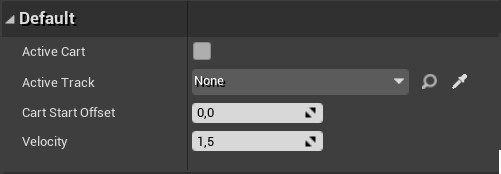
Vehicles have fewer settings. Active Cart defines if that vehicle should move (drive). Active Track is the BP_Tram_Spline that it should drive on. Cart Start Offset sets the point on the spline from where the vehicle will start the drive. Velocity is the constant speed it will move.
We prepare a separate tutorial (4.0) for this system.
3. Vehicle Tutorial (Complex / Physic Based)
3.1 First Track
3.2 First car
Go to Content directory and search for “road” and create a circle like street like on the image on the left.
Now form Blueprint/Traffic take BP_Road_Spline and put it on the road.

Spline roads are one-way. It's important to remember that vehicles will drive from the start of the spline to the end (not in reverse). The starting point is indicated by the white blueprint sphere. Also it's the pivot point. Always put the spline lines in that way.

Now select the end of the spline and move it to the end of the road.
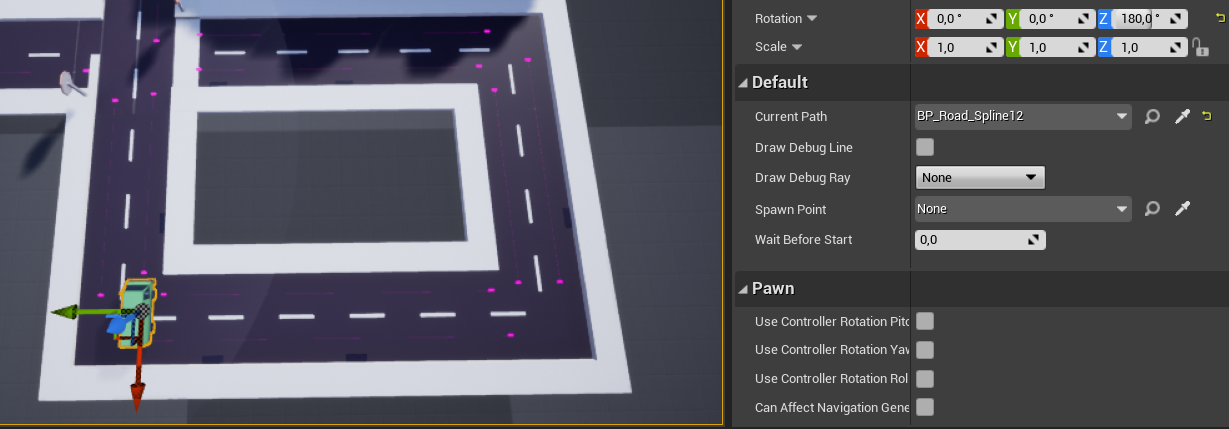
Now put the first car in front of the road spline. Once again, remember to put vehicles at the start of the spline.
The vehicle has some default options that need to be addressed. The current path is the first spline the vehicle will drive on. Without this it will stay in place.

Take the pipette and select spline road. It can be hard to pinpoint this red dot if not zoomed enough.
Now it is the most basic setup that the vehicle can have.
Run simulation and the car should run to the end of the road and stops.
3.3 Other vehicles avoidance
If the car runs on the other car in front it will stop.
Put a vehicle on the track to simulate that situation. To see the actual ray choose "for one frame" in Draw debug ray option. You can make it longer if needed in the AI_Drive blueprint using the ray length variable. But it is optimized for our assets already.
This option is good for debugging. Do not use this in production. To continue with the tutorial remove the obstacle car and turn off that debug option.
3.4 More Road Splines
Now put three more BP_Road_Spline around our track. Remember to keep the start of a new spline close to the end of the preceding spline.
Now we need to connect the splines together. Select the first one.

In the options select Turn left and pinpoint next spline. You can also use the drop-down menu.
Those three options: Straight, Left, Right are just named that for ease of use. It doesn't matter if it's really on the left. The vehicle will just randomly select one of them (if populated) and run to that spline. But use it according to the name as it will be helpful in more complicated scenarios.
Do this to the other splines. The last one should point out the first one closing the loop.
3.5 More Cars
Now let's add another car. Put it in the opposing corner and set its current path as the spline 3 (the one in front of the car).
Run the simulation.
3.6 Intersections
3.6.1 Simple T-section
Making an intersection is easy. First update our map to have a new road. Then add a BP_Road_Spline to it. It should start at the intersection and ending at the bottom.
Now select the road spline that was the last one before and ends at the intersection. Add Turn right as our new spline.

Now the vehicles will choose different paths (left or right in this example) each time they drive to that spot.
This feature makes traffic in the city so much more organic and unpredictable.
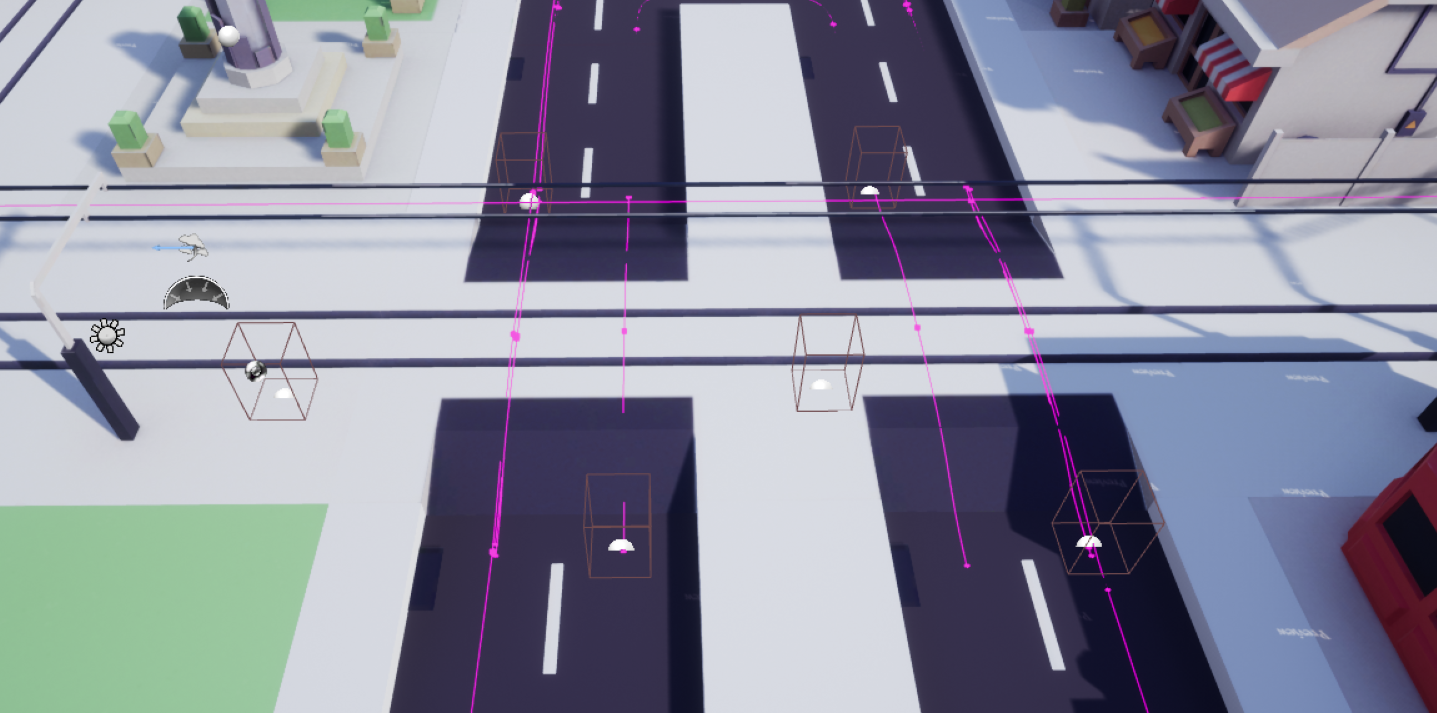
3.6.2 Intersection
Expand our map even further. Add another path as seen on the image below.
This time put road splines on both sides of the newly added roads. Connect all splines by reference them in Turn left or right. Remember to add them also to the old splines.

Add one more car and set it's current path to one in front of it.
Run simulation. All the cars will drive around, changing directions at the intersection.
3.6 Delays
Delay is extremely simple yet a very powerful feature if used creatively. Vehicles can delay the start and road splines can have a delay at the end. Mixing those properties we can simulate a stop before the stop sign, car starting from a parking lot, or driving to the gas station.
We prepare examples with those scenarios.
3.6.1 Stop
Stopping a car at a given pint is the easiest task. All you need is to have a spline that ends at the required spot and set it's Wait at End to something like 1 sec and be connected to one or more splines to continue driving.

One second is enough to car stops, simulates driver looking left and right, and starts driving again.
3.6.2 Parking lot
Simulating run out of the parking is easy. In this scenario, we placed a lot of static meshed models on the parking. Those will never run and should not use blueprint versions with AI for performance reasons. Next we added three vehicles with AI and one spline as the exit from the parking lot.

Each vehicle has set a delay before starting and this exit spline as current. Red runs with 1 second of delay, second with 6 and last with 24 seconds.
3.6.3 Gas station
The gas station scenario is a little bit more complicated. There are two splines and three cars.

One spline ends at the gas pump and has 4 seconds "Wait at End" set. Then it's connected to the next spline that ends at the stop sign and has 1s. delay.

As for cars the white truck points to that second spline and has 2s delay before a drive. Red and blue points to the first spline and stops there at arrival. The red car starts 3 seconds later and blue 20 seconds.
This way it looks like the drivers are waiting for their turn.
3.7 Spawn point
As in real life our system also makes crashing inevitable. Our AI only looks using one ray forward and can not avoid the obstacle in otherwise than stopping. Sometimes a vehicle can force the way over an intersection and hit other vehicles. This can end up in a big crash and traffic jam.
In a big city with a lot of vehicles, this eventually stops all traffic. To fix this we implemented the easiest solution - restarting stuck vehicles at spawn points.
3.7.1 Setup
In the Traffic directory find BP_Vehicle_SpawnPoint and put in on the end of a traffic system. In our example at the end of the city we created two of those. One in the north and another in the south.

Spawn Point will show a dumb vehicle as a reference, this will not be visible in-game and/or during the simulation. This grey car is representing the position of spawned cars.
Set the First Path to the closes road spline. Each new car will get this copied and start to drive this spline.
It's a good practice to have a few spawning pints and name them accordingly for easy referencing.
Now on each vehicle reference those spawning points. Try to make it evenly distributed over the cars. This way they will be arriving in the city from spawning points at even peace.

Remember to always set a Spawn Point each time you add a new vehicle to the map. Vehicles without this reference set will not restart and stay on the map while crashed.
3.7.2 Restarting
Now after any car got stuck for more than 5 seconds it will restart at its spawn point.
3.7.3 Spawn Point timeout
If that value is not good for your project you can easily change it. Go to the AI_Driver blueprint, click the Class Defaults on top.

On the right you have default values for all variables.

Vehicle Stuck Max Time is the one you're looking for. Increase this value.
4. Vehicle Tutorial (Simple)

4.1 Spline Setup
In this tutorial you will BP_Vehicle_Simple to make a simple but fast and efficient traffic system. It works with traffic lights (described in next chapter).
Put splines on each track where cars should drive. Cars can't change its tracks so you need to make splines for each set of vehicles.
In this example put four splines that have its ends connected (there is no gap in the track). Look at the images on the left.
4.2 Cars Placement
Populating map with cars can be achieved in two ways. Automatic and manual. In most situations, the automatic way will be sufficient. It will generate random car types based on the seed value. The manual setup should be used if the exact cars need to be placed in specific points on the road.
4.2.1 Automatic
Each spline can auto-spawn random cars at runtime. For a big city, it's very useful. Set the max number of vehicles to spawn and check auto spawning. Cars will spawn each time the same way. If you want another set just change random seed to any different random number.
With a complex city structure with a lot of intersections, it's a wise move to play the simulation for some time and check if they don't block or generate too long traffic jams. In that situation just decrease the number of spawned cars on the most problematic roads.
There is a possibility to spawn cars right in the editor. It is very useful for doing cinematics. Spawn Cars and Remove My Cars are the button for this.
Cars are randomly picked from the Vehicles array. If you want to spawn only trucks just remove all other cars form the array. Or just leave one to always spawn that type.
4.2.2 Manual
Manual means placing each car in the editor and set up it correctly. It is more time consuming and requires sane parameter settings but it gives the most power to designers.
Put a few cars on each road. Each of them will be connected to one spline that will drive around.

Set default options. Active Cart means that this vehicle will move. Active Track is the spline on which it will drive.
Cart Start Offset is a value from 0.0 to 1.0 that defines the position on that spline. 0 is the beginning and the 1 is the end. 0.5 will be exactly the middle of the spline.
If you assign more than one vehicle to the same spline arrange them with offsets.

Lastly set Velocity - the speed of the vehicle.
4.2.3 Master Controller
To make automatic spawners easier to use in the editor we created a master controller for it. It's a blueprint that you place anywhere on the map (it's not visible in the game) and with one button create or remove all cars on all connected splines.
To make it work just add all the BP_Road_Spline_Simple splines you want to control to the master controller array.
After that pressing Spawn Cars and Remove Cars will trigger same button on each connected spline.
This just provides barebones of functionality that we needed. This blueprint is a perfect starting point to add things like controlling the speed or increase/decrease the number of spawned cars from a single place.
5. Traffic Lights System
Traffic stoplights are an essential part of any bigger city. Our asset has few intersections parts with stoplights in it. To make them work (cars to stop) it's very easy.
5.1 Single Light

All you need to do is take BP_TrafficLight and drop it at the intersection where the cars should stop.
That’s it.
5.2 Paired Lights

But on real intersections lights works in pairs. When one is green the other is red. Our lights have the same functionality. To do this first drop stoplights on the right side of the roads.

Then set one of them as a master. In the master add array with all other (slave) lights. Just pick them.

Then set on each of them if they should reverse the light of master. On a four-way intersection two will have green while two other will be reversed.
This works the same for both BP_Vehicle and BP_Vehicle_Simplest systems.
6. Tram System

6.1 Splines Setup

The Tram system is one of the easiest to use. All you need is a BP_Tram_Spline from the Traffic directory. Make it continuous - starts and ends in the same place. That way the tram will not disappear at the end of the line but continue its journey.
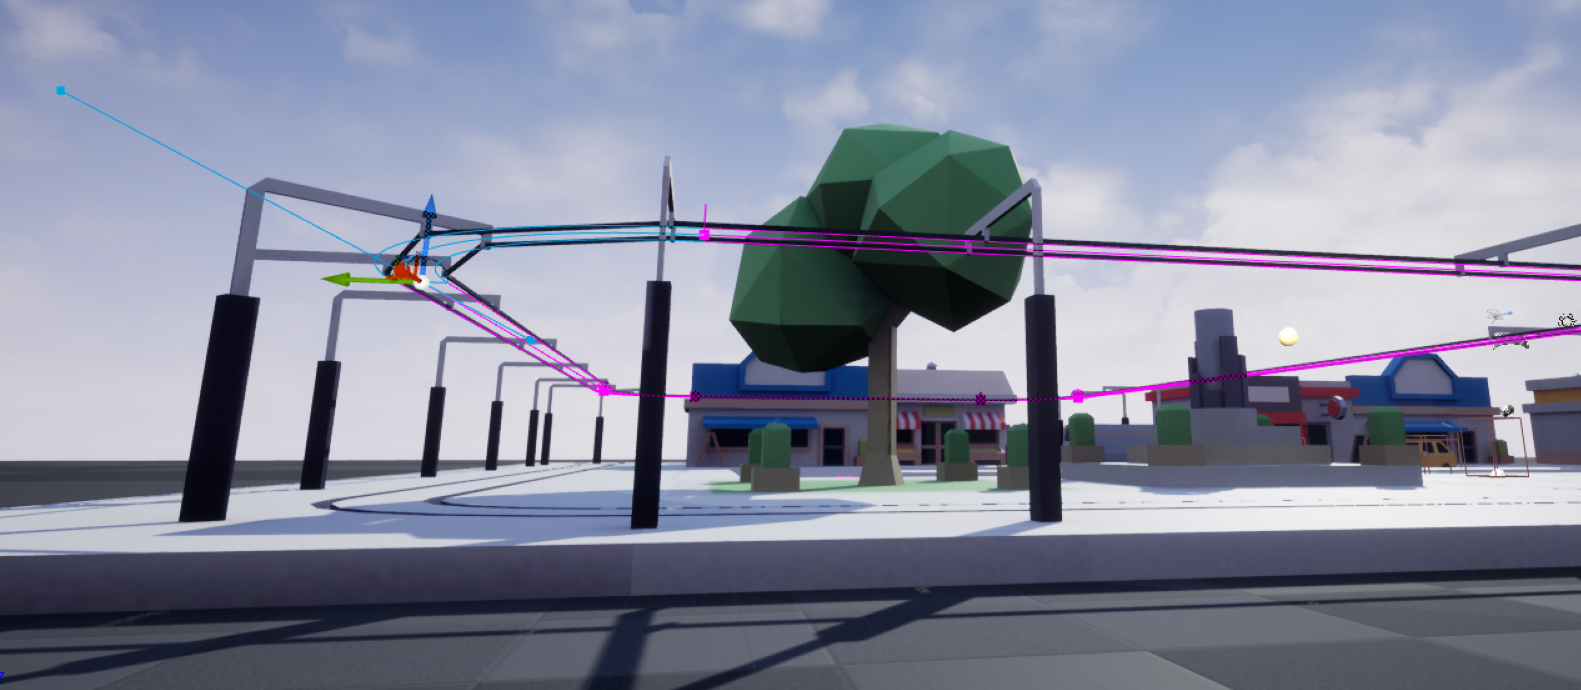
Tram is connected to the spline by the top trolley pole. That's why the spline line should be at the level of traction.
6.2 Tram Setup
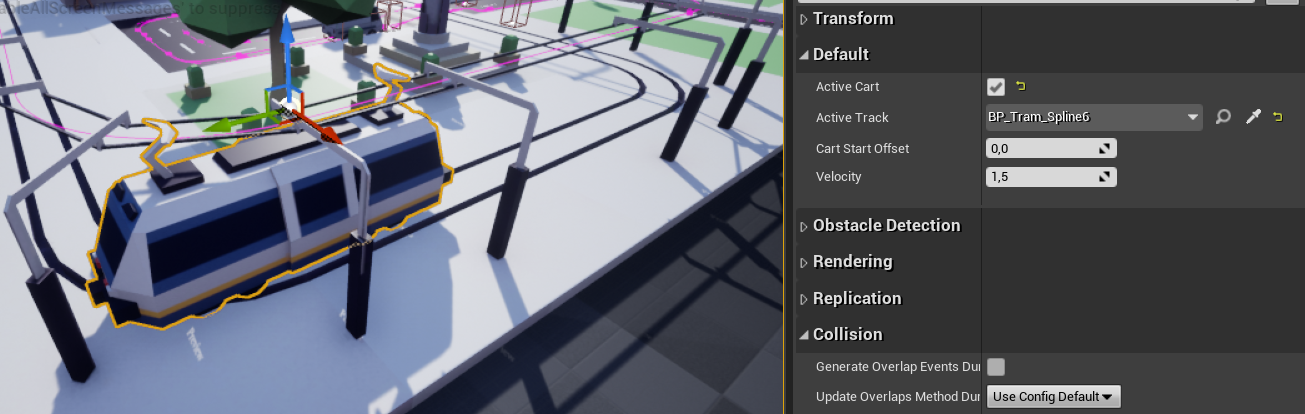
Next put our BP_Tram_White from Vehicles directory at the beginning of the spline. Set Active Track to the spline and increase Velocity to something like 35

Now tram will ride circles over our track. It uses ray-casting to avoid collisions and can be mixed with traffic lights to stop at intersections.
7. Planes System

The planes system works similar to the train system. It uses one continuous spline (connected to itself at the end). It has two modes: for taxing and flying.
7.1 Taxing

Taxing means that the plane drives at the airport but do not take off. It can drive to the hangar or for passengers.

To do this put a BP_Airplane_Spline from Traffic directory and connect it's endings together to make it continuous. The plane will drive over this spline forever.
Put the plane at the beginning of the spline.

Now set up the default values correctly. Set Active Plane to on. Active Track to this spline. Duration is how long it will take to take from start to the end of the track. Start offset is where the plane is placed and from where it should start to drive (0 in this example). Wait Time After Fly is the time it will wait after arriving at the end of the spline. And the most important setting is Taxing. In this scenario it needs to be on.

Now when you start the simulation plane should cruising around its track.
7.2 Flying

Flying is very similar but simulates take-off and landing.
Make the continuous spline but this time part of it in the air. To make the plane fly more realistic rotate splines that are in the air at corners over X-axis so the plane will roll when taking the turn.

Set-up is the same but remember to make Taxing off. Also, add some time to Wait Time After Start so the plane will not take-off too fast after landing.

Simulate and tweak the Duration. Observe that plane gains speed at take-off and gently stops at landing.

7.3 Propeller vs Jet Planes

Planes that use propellers have their own blueprint. But works exactly the same as jet planes. They are using animations and needed separate set-ups.
You use both of them in the same way.
8.0 Pedestrians System
The city without its citizens is just a set of buildings. That's why we implemented a simple pedestrian system. The asset includes two sets of people - squared and rounded.
The system works similar to tram and simple cars. One additional feature is that it can be automatically populated by random pedestrians.
8.1 Spline
Use BP_Pedestrians_Spline and make a closed track. If your city is built like Manhattan it's easy to use spline tools to make a perfect loop.
Then this spline can be duplicated to other blocks.
Once the spline is ready there are two possibilities. One is automatic and the second is manual.
Try not to mix tram/car splines with the pedestrians. Pedestrians do not interact with other vehicles. They are like ghosts.
Citizens are added for aesthetic touch and to make the city more alive.
8.2 Automatic
The automatic method will choose a randomly set amount of people (How Many parameter) from a set bank (square or rounded). Then it will give them a random position on the spline. It's the fastest and easiest way to just have a bunch of people walking around the block.
You can tweak the speed to match the animation using Pedestrians Movement Speed parameter.
8.3 Manual
If you need more control for a specific scenario you can use a manual method. Put any of the prepared people blueprints near the spline. Each of them needs to have a spline set and checked movable. The position on the spline is from 0 (start) to 1 (end). 0.5 will be the middle.
When you start the simulation they will be teleported to those positions and start walking with set speed.
Delay is useful if you want to simulate people walking out of the building one by one - all from the same starting point (inside a building). Make the end of that spline also in some other building to prevent disappearing at the end.
8.4 Square vs Rounded
You can easily choose between two banks of pedestrian styles using one checkbox. Default mode is for squared citizens.
Checking Use Rounded Pedestrians swaps the bank and populates the spline with second set of citizens.
9.0 Custom Actor for Cinematics
For recording our cinematics we needed a fine control over some key actors. For that, we created special blueprints to control movements of objects (pedestrians, cars, planes) over spline by timeline. This allows for setting up scenes with the camera attached to or focused at the actor.
9.1 Setup
Put BP_Custom_Actor_Spline and add BP_Custom_Actor. Set Active Track in Actor to the spline and check Enabled switch. Now it is possible to move our actor using Position Along Spline value (0-1).
When Manual Animation is off the actor will move along spline using Speed. When on it will use Position Along Spline (that can be controlled by cinematic timeline).
Wheels Speed controls the speed of the wheels (if the actor has one).
9.2 Level Sequence
To animate our actor add Level Sequence. Add custom actor.
Then track repeater event.
9.3 SequenceDirector
Double click on the event timeline to open SequenceDirector. From BP Custom Actor add Refresh Position. Compile and save.